> ## Documentation Index
> Fetch the complete documentation index at: https://docs.twenty.com/llms.txt
> Use this file to discover all available pages before exploring further.
# 前端组件
> 构建可在 Twenty 的 UI 中渲染并具备沙盒隔离的 React 组件。
前端组件是直接在 Twenty 的 UI 内渲染的 React 组件。 它们在使用 Remote DOM 的**隔离 Web Worker**中运行——你的代码在沙盒化的、不透明来源的 iframe 中执行,但其 UI 仍然原生渲染在页面中,而不是被限制在该 iframe 内。
## 前端组件可用位置
在 Twenty 中,前端组件可以在三个位置进行渲染:
* **侧边栏** — 非无头的前端组件会在右侧侧边栏中打开。 当前端组件从命令菜单触发时,这是默认行为。
* **小部件(仪表盘和记录页面)** — 前端组件可以作为小部件嵌入到[页面布局](/l/zh/developers/extend/apps/layout/page-layouts)中。 在配置仪表盘或记录页面布局时,用户可以添加前端组件小部件。
* **应用设置** — 使用 [`defineSettingsFrontComponent()`](#custom-settings-component) 定义后,该前端组件将作为一个部分渲染在应用的 **Settings** 选项卡中,以替代默认的变量配置界面。
单独存在的前端组件无法从界面中访问 —— 你需要将它*呈现*出来。 实现这一点有三种方式:
* **将它与[命令菜单项](/l/zh/developers/extend/apps/layout/command-menu-items)配对** —— 将其注册到命令菜单(Cmd+K)中,并可选地将其设为固定快速操作。
* **将它作为小部件嵌入到[页面布局](/l/zh/developers/extend/apps/layout/page-layouts)中** —— 将其放置在记录详情页面或仪表盘上。
* **使用 [`defineSettingsFrontComponent()`](#custom-settings-component) 定义** — 将其渲染为应用 **Settings** 选项卡中的一个部分,以替代默认的变量配置界面。
## 基础示例
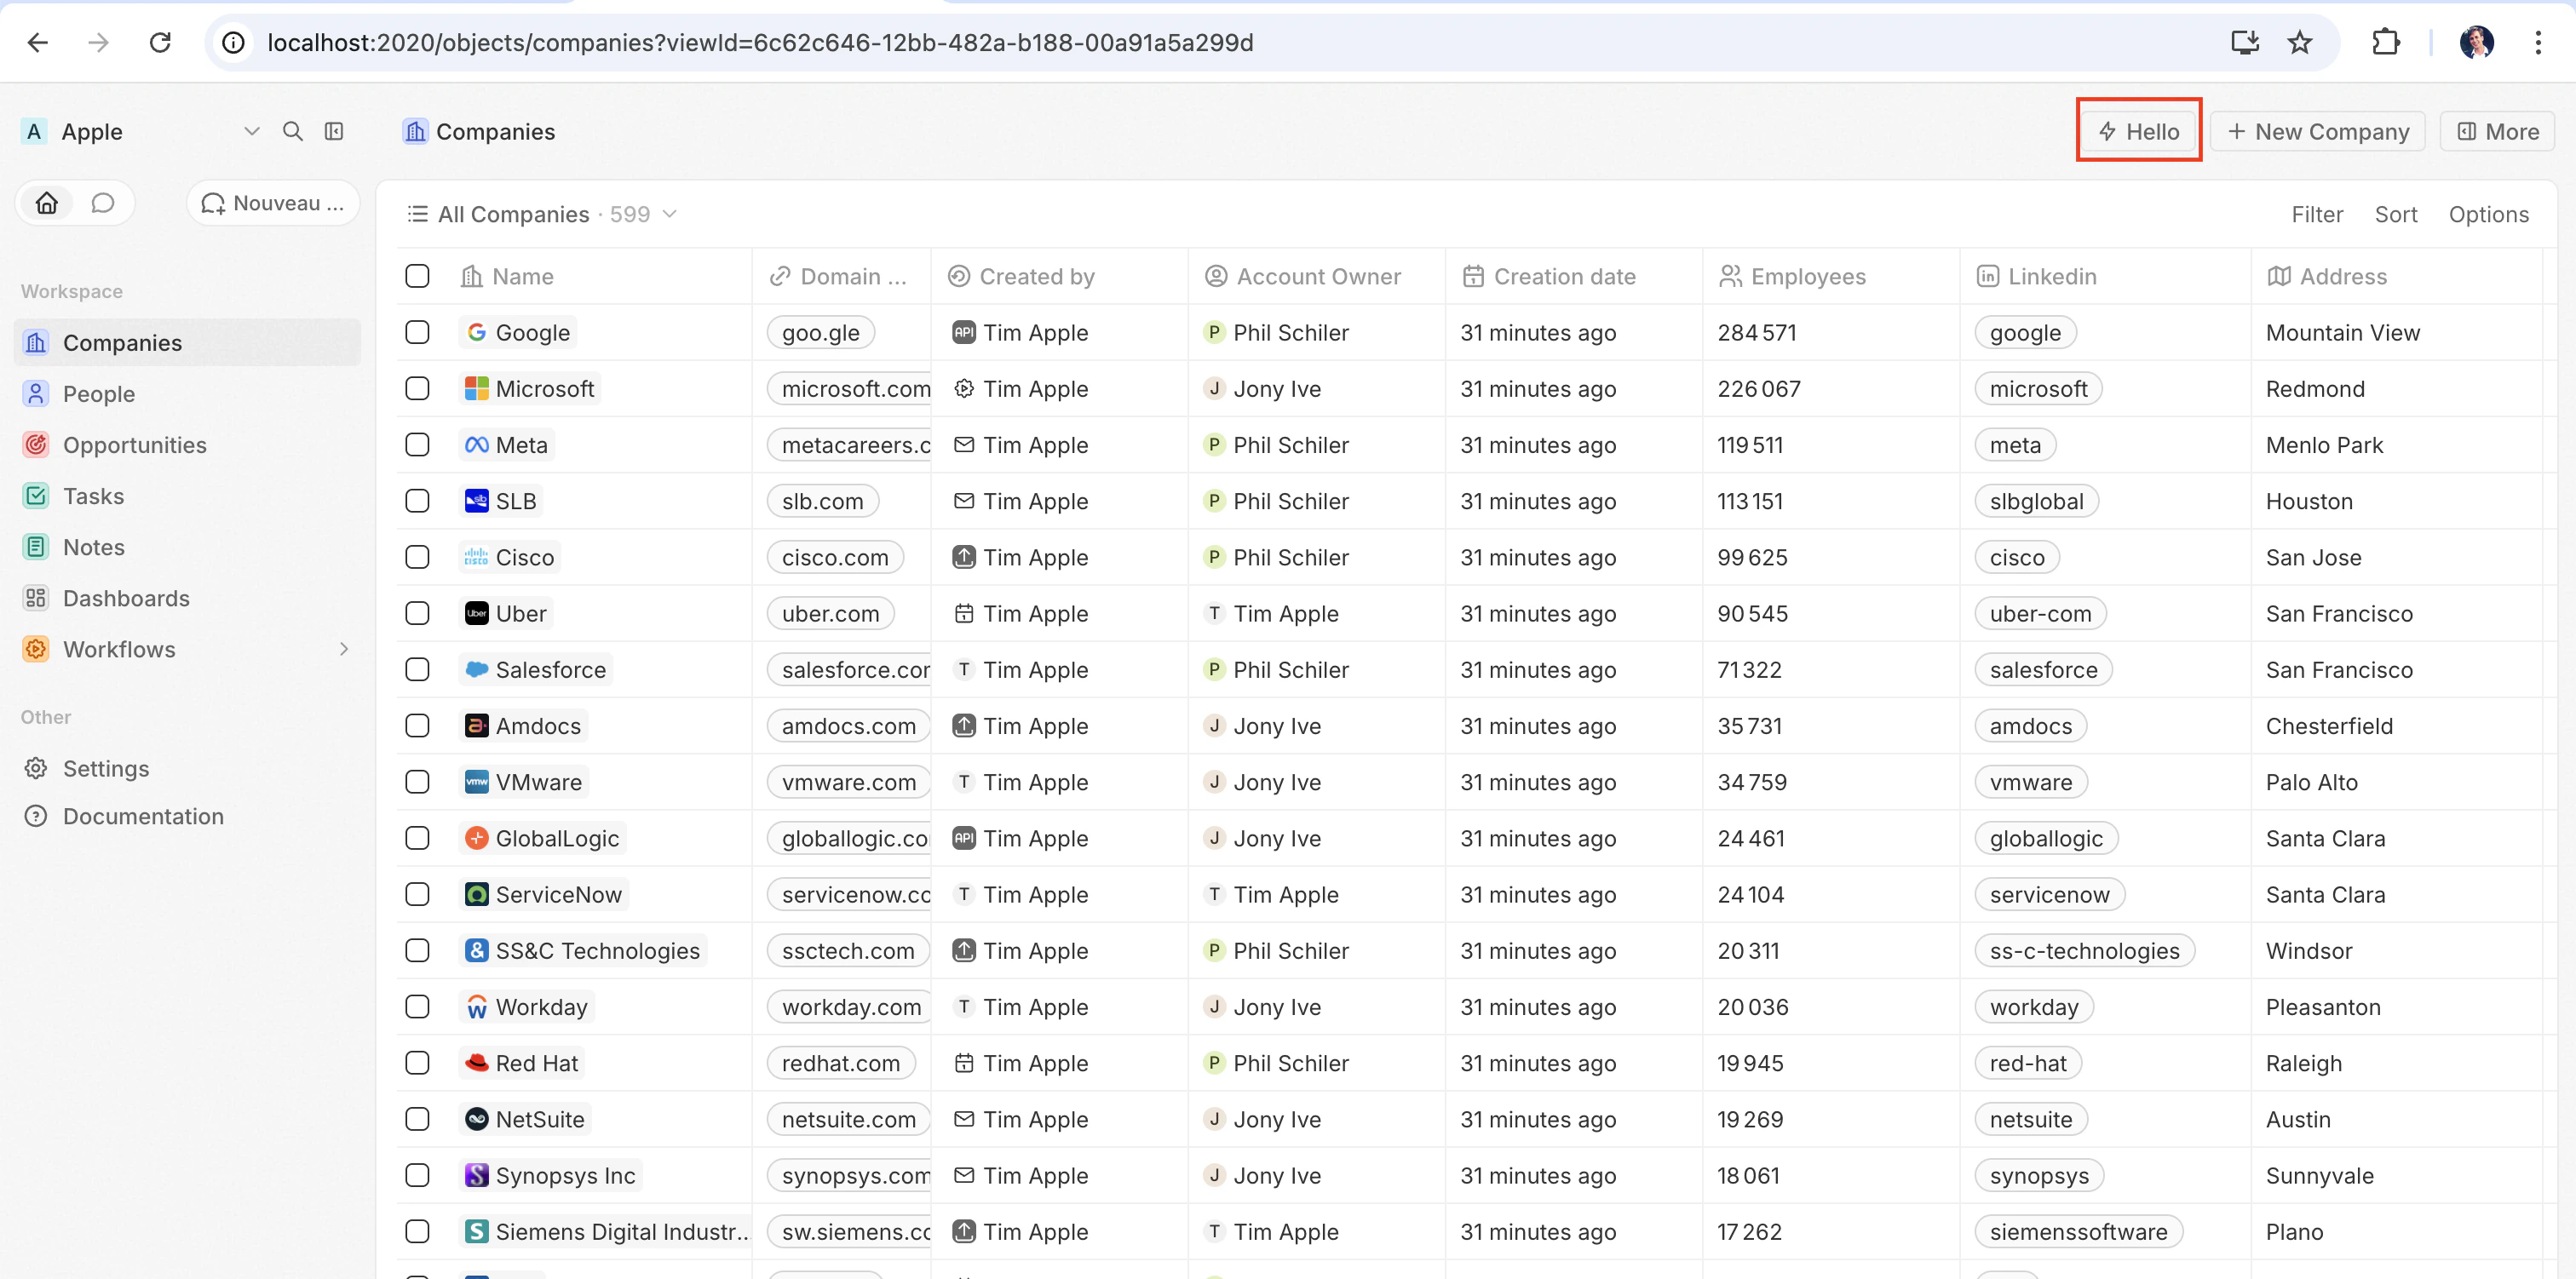
最快看到前端组件实际效果的方式是将它与[`defineCommandMenuItem`](/l/zh/developers/extend/apps/layout/command-menu-items)配对,这样它就会显示为页面右上角的快速操作按钮:
```tsx src/front-components/hello-world.tsx theme={null}
import { defineFrontComponent } from 'twenty-sdk/define';
const HelloWorld = () => {
return (
Hello from my app!
This component renders inside Twenty.
);
};
export default defineFrontComponent({
universalIdentifier: '74c526eb-cb68-4cf7-b05c-0dd8c288d948',
name: 'hello-world',
description: 'A simple front component',
component: HelloWorld,
});
```
```ts src/command-menu-items/hello-world.command-menu-item.ts theme={null}
import { defineCommandMenuItem } from 'twenty-sdk/define';
export default defineCommandMenuItem({
universalIdentifier: 'd4e5f6a7-b8c9-0123-defa-456789012345',
shortLabel: 'Hello',
label: 'Hello World',
isPinned: true,
availabilityType: 'GLOBAL',
frontComponentUniversalIdentifier: '74c526eb-cb68-4cf7-b05c-0dd8c288d948',
});
```
使用 `yarn twenty dev` 同步后(或单次运行 `yarn twenty apply`),快速操作会出现在页面右上角:
点击它以内联方式渲染该组件。
## 配置字段
| 字段 | 必填 | 描述 |
| --------------------- | -- | ---------------------------- |
| `universalIdentifier` | 是 | 该组件的稳定唯一 ID |
| `component` | 是 | 一个 React 组件函数 |
| `name` | 否 | 显示名称 |
| `description` | 否 | 组件的功能描述 |
| `isHeadless` | 否 | 如果组件没有可见的 UI,则设为 `true`(见下文) |
## 在页面上放置前端组件
除了命令之外,你还可以在**页面布局**中将其添加为小部件,从而将前端组件直接嵌入记录页面。 详情请参见[页面布局](/l/zh/developers/extend/apps/layout/page-layouts)。
## 自定义设置组件
要在应用的 **Settings** 选项卡中,用你自己的组件替换自动生成的变量配置界面,请使用 `defineSettingsFrontComponent` 而不是 `defineFrontComponent` 来进行定义。 它使用相同的[配置字段](#configuration-fields)(除了 `isHeadless`,由于设置组件始终会渲染可见的 UI,因此不接受该字段),并另外将该组件标记为应用的设置 UI。
该组件会渲染为设置选项卡内的一个部分,而不是替换整个选项卡。 Twenty 的系统管理部分——自动升级、App URL 和连接——始终渲染在它上方,且无法被应用覆盖。
```tsx src/front-components/app-settings.tsx theme={null}
import { defineSettingsFrontComponent } from 'twenty-sdk/define';
const AppSettings = () => {
return (
My app settings
{/* render your own configuration UI here */}
);
};
export default defineSettingsFrontComponent({
universalIdentifier: 'a1b2c3d4-e5f6-7890-abcd-ef1234567890',
name: 'app-settings',
description: "Custom UI for the app's Settings tab",
component: AppSettings,
});
```
每个应用仅允许有一个设置前端组件;声明多个会导致构建失败。 如果存在,应用的 **Settings** 选项卡会渲染此组件来替代默认的变量配置 UI。
## 无头与非无头
前端组件有两种由 `isHeadless` 选项控制的渲染模式:
**非无头(默认)** — 该组件会渲染可见的 UI。 从命令菜单触发时,它会在侧边栏中打开。 当 `isHeadless` 为 `false` 或被省略时,这是默认行为。
**无头 (`isHeadless: true`)** — 该组件会在后台以不可见的方式挂载。 它不会打开侧边栏。 无头组件旨在用于执行逻辑后自行卸载的操作——例如运行异步任务、导航到某个页面或显示确认模态框。 它们与下文介绍的 SDK Command 组件天然契合。
```tsx src/front-components/sync-tracker.tsx theme={null}
import { defineFrontComponent } from 'twenty-sdk/define';
import { useSelectedRecordIds, enqueueSnackbar } from 'twenty-sdk/front-component';
import { useEffect } from 'react';
const SyncTracker = () => {
const [recordId] = useSelectedRecordIds();
useEffect(() => {
enqueueSnackbar({ message: `Tracking record ${recordId}`, variant: 'info' });
}, [recordId]);
return null;
};
export default defineFrontComponent({
universalIdentifier: '...',
name: 'sync-tracker',
description: 'Tracks record views silently',
isHeadless: true,
component: SyncTracker,
});
```
由于该组件返回 `null`,Twenty 会跳过为其渲染容器——布局中不会出现空白区域。 该组件仍可访问所有 hooks 和宿主通信 API。
## SDK Command 组件
`twenty-sdk` 包提供了四个为无头前端组件设计的 Command 辅助组件。 每个组件都会在挂载时执行一个操作,通过显示 snackbar 通知来处理错误,并在完成后自动卸载该前端组件。
从 `twenty-sdk/front-component` 导入它们:
* **`Command`** — 通过 `execute` 属性运行异步回调。
* **`CommandLink`** — 导航到某个应用路径。 属性:`to`、`params`、`queryParams`、`options`。
* **`CommandModal`** — 打开一个确认模态框。 如果用户确认,则执行 `execute` 回调。 属性:`title`、`subtitle`、`execute`、`confirmButtonText`、`confirmButtonAccent`。
* **`CommandOpenSidePanelPage`** — 打开一个侧边栏页面。 Props 取决于 `page` —— 例如,`ViewRecord` 需要 `recordId` + `objectNameSingular`(以及一个可选的 `tab` id,用于在特定标签页中打开该记录),其他页面需要 `pageTitle` + `pageIcon`。
下面是一个完整示例:无头前端组件使用 `Command` 从命令菜单运行一个操作:
```tsx src/front-components/run-action.tsx theme={null}
import { defineFrontComponent } from 'twenty-sdk/define';
import { Command } from 'twenty-sdk/front-component';
import { CoreApiClient } from 'twenty-client-sdk/core';
const RunAction = () => {
const execute = async () => {
const client = new CoreApiClient();
await client.mutation({
createTask: {
__args: { data: { title: 'Created by my app' } },
id: true,
},
});
};
return ;
};
export default defineFrontComponent({
universalIdentifier: 'e5f6a7b8-c9d0-1234-efab-345678901234',
name: 'run-action',
description: 'Creates a task from the command menu',
component: RunAction,
isHeadless: true,
});
```
```ts src/command-menu-items/run-action.command-menu-item.ts theme={null}
import { defineCommandMenuItem } from 'twenty-sdk/define';
export default defineCommandMenuItem({
universalIdentifier: 'f6a7b8c9-d0e1-2345-fabc-456789012345',
label: 'Run my action',
frontComponentUniversalIdentifier: 'e5f6a7b8-c9d0-1234-efab-345678901234',
});
```
另一个示例:使用 `CommandModal` 在执行前请求确认:
```tsx src/front-components/delete-draft.tsx theme={null}
import { defineFrontComponent } from 'twenty-sdk/define';
import { CommandModal } from 'twenty-sdk/front-component';
const DeleteDraft = () => {
const execute = async () => {
// perform the deletion
};
return (
);
};
export default defineFrontComponent({
universalIdentifier: 'a7b8c9d0-e1f2-3456-abcd-567890123456',
name: 'delete-draft',
description: 'Deletes a draft with confirmation',
component: DeleteDraft,
isHeadless: true,
});
```
以及一个使用 `CommandOpenSidePanelPage` 的示例,用于在特定标签页的侧边栏中打开当前记录。 `tab` 是页面布局的标签页 id(默认布局使用类似 `company-tab-emails` 或 `company-tab-timeline` 这样的 id;自定义布局使用标签页自身的 id)。 如果该 id 在记录的布局中不存在,则会改为打开默认标签页:
```tsx src/front-components/open-company-emails.tsx theme={null}
import { defineFrontComponent } from 'twenty-sdk/define';
import {
CommandOpenSidePanelPage,
SidePanelPages,
useSelectedRecordIds,
} from 'twenty-sdk/front-component';
const OpenCompanyEmails = () => {
const selectedRecordIds = useSelectedRecordIds();
const recordId = selectedRecordIds.length === 1 ? selectedRecordIds[0] : null;
if (!recordId) {
return null;
}
return (
);
};
export default defineFrontComponent({
universalIdentifier: 'b8c9d0e1-f2a3-4567-bcde-678901234567',
name: 'open-company-emails',
description: 'Opens the current company on its Emails tab',
component: OpenCompanyEmails,
isHeadless: true,
});
```
## 调用逻辑函数
前端组件在浏览器端的 Web Worker 中运行,该 Web Worker 被沙盒化在不透明来源的 iframe 中,而[逻辑函数](/l/zh/developers/extend/apps/logic/logic-functions)在服务器端运行。 二者之间没有直接的进程内调用——前端组件通过 HTTP 访问逻辑函数。
使用 `httpRouteTriggerSettings` 声明的逻辑函数,可以通过其路由路径在 HTTP 上进行访问。 `RestApiClient` 会将以 `/s/` 开头的路径视为应用路由,将其解析到你的函数提供服务的 URL,并使用 `TWENTY_APP_ACCESS_TOKEN` 对其进行认证。
> **在 Twenty Cloud 上,HTTP 触发的逻辑函数通过每个工作区的专用域名提供服务**,域名为 `https://\.withtwenty.com\`。 对于外部调用方,请从函数的 **HTTP trigger** 设置或应用的 **Settings** 选项卡中复制准确的 URL。
无头前端组件可以通过 `Command` 组件在挂载时执行调用,然后自动卸载:
```tsx src/front-components/sync-prs.tsx theme={null}
import { RestApiClient } from 'twenty-client-sdk/rest';
import { defineFrontComponent } from 'twenty-sdk/define';
import { Command } from 'twenty-sdk/front-component';
const SyncPrs = () => {
const execute = async () => {
await new RestApiClient().post('/s/github/fetch-prs', {
owner: 'twentyhq',
repo: 'twenty',
});
};
return ;
};
export default defineFrontComponent({
universalIdentifier: '...',
name: 'sync-prs',
description: 'Triggers the fetch-prs logic function',
isHeadless: true,
component: SyncPrs,
});
```
传递给 `RestApiClient` 的路径是逻辑函数的 `httpRouteTriggerSettings.path`,并以 `/s` 作为前缀。 保持 `isAuthRequired: true`;Twenty 为你的组件生成的 `TWENTY_APP_ACCESS_TOKEN` 会对请求进行认证:
```ts src/logic-functions/fetch-prs.logic-function.ts theme={null}
import { defineLogicFunction } from 'twenty-sdk/define';
import type { RoutePayload } from 'twenty-sdk/logic-function';
const handler = async (event: RoutePayload) => {
const { owner, repo } = (event.body ?? {}) as { owner: string; repo: string };
// ...fetch from GitHub and persist records...
return { ok: true };
};
export default defineLogicFunction({
universalIdentifier: '...',
name: 'fetch-prs',
handler,
httpRouteTriggerSettings: {
path: '/github/fetch-prs',
httpMethod: 'POST',
isAuthRequired: true,
},
});
```
`TWENTY_APP_ACCESS_TOKEN` 会被自动注入——参见 [应用变量](#application-variables)。 由于机密应用变量永远不会暴露给前端组件,请将 API 密钥和其他敏感逻辑保留在逻辑函数中,而不是前端组件中。
### 调用 Twenty REST API
要在前端组件中调用应用 HTTP 路由或读取、写入 Twenty 记录,请使用来自 `twenty-client-sdk/rest` 的 `RestApiClient`。 它会将 `/s/...` 路径发送到你工作区的函数基础 URL,而将包括 `/rest/...` 在内的其他所有路径发送到 `TWENTY_API_URL`。
| 方法 | 描述 |
| --------------------------------- | ----------------------------- |
| `get(path, options?)` | 发送一个 `GET` 请求 |
| `post(path, body?, options?)` | 发送一个 `POST` 请求 |
| `put(path, body?, options?)` | 发送一个 `PUT` 请求 |
| `patch(path, body?, options?)` | 发送一个 `PATCH` 请求 |
| `delete(path, options?)` | 发送一个 `DELETE` 请求 |
| `request(method, path, options?)` | 使用任意 HTTP 方法的通用请求 |
| `resolveUrl(path, options?)` | 在不发送请求的情况下将路径解析为其完整 URL(用于链接) |
`options` 接受 `headers`、`query`(查询字符串参数记录;空值会被跳过),以及通过 `signal` 传入的 `AbortSignal`。 非 `FormData` 类型的对象 `body` 会被自动进行 JSON 序列化。 在收到 `401` 时,客户端会通过宿主刷新一次访问令牌,然后重试该请求。
基础 URL 和令牌默认会从环境中解析得到。 在需要时将覆盖项传递给构造函数——例如在测试中:
```ts theme={null}
const client = new RestApiClient({
baseUrl: 'https://myworkspace.twenty.com',
token: 'my-token',
});
```
失败的请求会抛出 `RestApiClientError`,其中包含 `status`、`statusText`、`url` 和已解析的 `body`:
```tsx theme={null}
import { RestApiClient, RestApiClientError } from 'twenty-client-sdk/rest';
const client = new RestApiClient();
try {
const people = await client.get('/rest/people', {
query: { limit: 10 },
});
} catch (error) {
if (error instanceof RestApiClientError) {
console.error(error.status, error.body);
}
}
```
## 访问运行时上下文
在组件内部,使用 SDK 的 hooks 获取当前用户、记录和组件实例:
```tsx src/front-components/record-info.tsx theme={null}
import { defineFrontComponent } from 'twenty-sdk/define';
import {
useUserId,
useSelectedRecordIds,
useFrontComponentId,
} from 'twenty-sdk/front-component';
const RecordInfo = () => {
const userId = useUserId();
const [recordId] = useSelectedRecordIds();
const componentId = useFrontComponentId();
return (
User: {userId}
Record: {recordId ?? 'No record context'}
Component: {componentId}
);
};
export default defineFrontComponent({
universalIdentifier: 'b2c3d4e5-f6a7-8901-bcde-f23456789012',
name: 'record-info',
component: RecordInfo,
});
```
可用的 hooks:
| 钩子 | 返回值 | 描述 |
| --------------------------------------------- | -------------------- | ------------------------------------- |
| `useUserId()` | `string` 或 `null` | 当前用户的 ID |
| `useSelectedRecordIds()` | `字符串[]` | 所有已选择的记录 ID(如果未选择,则为空数组) |
| `useRecordId()` | `string` 或 `null` | **已弃用。** 请改用 `useSelectedRecordIds()` |
| `useFrontComponentId()` | `string` | 此组件实例的 ID |
| `useColorScheme()` | `'light'` 或 `'dark'` | 宿主 UI 当前的配色方案(`System` 已解析) |
| `useFrontComponentExecutionContext(selector)` | 因情况而异 | 使用选择器函数访问完整的执行上下文 |
## 应用程序变量
在 [`defineApplication()`](/l/zh/developers/extend/apps/config/application) 中定义、且 `isSecret: false` 的应用程序变量,可以通过 `getApplicationVariable` 实用工具在前端组件中使用:
```tsx src/front-components/greeting.tsx theme={null}
import { defineFrontComponent } from 'twenty-sdk/define';
import { getApplicationVariable } from 'twenty-sdk/front-component';
const Greeting = () => {
const recipientName = getApplicationVariable('DEFAULT_RECIPIENT_NAME') ?? 'World';
return Hello, {recipientName}!
;
};
export default defineFrontComponent({
universalIdentifier: '...',
name: 'greeting',
component: Greeting,
});
```
机密变量(`isSecret: true`)**不会**暴露给前端组件。 它们仅在服务器端运行的 [逻辑函数](/l/zh/developers/extend/apps/logic/logic-functions) 中可用。 这可以防止诸如 API 密钥之类的敏感值被发送到浏览器。
无论变量声明的 `type` 为何,`getApplicationVariable` 始终返回一个 **string**(或 `undefined`)。 该字符串会按照类型被一致地序列化(布尔值为 `"true"` / `"false"`,数字为十进制字符串,数组 / 对象为 JSON),与逻辑函数 `process.env` 使用的格式相同 —— 需要你自行解析(`Number(...)`、`JSON.parse(...)`、`=== 'true'`)。 参见[变量类型](/l/zh/developers/extend/apps/config/application#variable-types)。
以下系统变量始终可以通过 `process.env` 获取:
| 变量 | 描述 |
| ------------------------- | --------------------- |
| `TWENTY_API_URL` | Twenty 核心 API 的基础 URL |
| `TWENTY_APP_ACCESS_TOKEN` | 限定在你的应用角色范围内的短期令牌 |
### `TWENTY_FUNCTIONS_URL`
Twenty 还会将 `TWENTY_FUNCTIONS_URL` 注入到前端组件和逻辑函数中:也就是你的应用的 HTTP 触发逻辑函数所提供服务的基础 URL。
之所以存在这个变量,是因为该 URL 并不总是 Twenty 服务器本身。 在 Twenty Cloud 上,应用路由通过每个工作区的专用域名提供服务(`https://\.withtwenty.com`,或者在已配置时为应用的主公共域名),以便应用生成的响应运行在一个与 Twenty 应用源不同的隔离源上。 自托管和本地实例会在服务器本身的 `/s` 前缀下提供应用路由,并且可能完全不会设置该变量。 由于基础 URL 会因工作区和实例而异,你的代码不能将其硬编码——服务器会在运行时注入正确的值。
你很少需要直接读取它。 通过 `RestApiClient` 使用带有 `/s/` 前缀的路径来调用你的路由,客户端会为你解析 URL:它会去掉 `/s` 前缀并将请求发往 `TWENTY_FUNCTIONS_URL`,在该变量未设置时则回退到 `\/s`。 使用 `resolveUrl('/s/\')` 来在不发送请求的情况下获取绝对 URL,例如用于链接。 仅在手动构建 URL 时才直接读取该变量:
```ts theme={null}
const routeUrl = `${process.env.TWENTY_FUNCTIONS_URL || `${process.env.TWENTY_API_URL}/s`}/documents/generate`;
```
## 宿主通信 API
前端组件可以使用来自 `twenty-sdk` 的函数触发导航、模态框和通知:
| 函数 | 描述 |
| ----------------------------------------------- | ------------- |
| `navigate(to, params?, queryParams?, options?)` | 在应用中导航到某个页面 |
| `openSidePanelPage(params)` | 打开侧边栏 |
| `closeSidePanel()` | 关闭侧边栏 |
| `openCommandConfirmationModal(params)` | 显示确认对话框 |
| `enqueueSnackbar(params)` | 显示一条 Toast 通知 |
| `unmountFrontComponent()` | 卸载该组件 |
| `updateProgress(progress)` | 更新进度指示器 |
下面是一个示例,使用宿主 API 在操作完成后显示一条 snackbar 并关闭侧边栏:
```tsx src/front-components/archive-record.tsx theme={null}
import { defineFrontComponent } from 'twenty-sdk/define';
import { enqueueSnackbar, closeSidePanel, useSelectedRecordIds } from 'twenty-sdk/front-component';
import { CoreApiClient } from 'twenty-client-sdk/core';
const ArchiveRecord = () => {
const [recordId] = useSelectedRecordIds();
const handleArchive = async () => {
const client = new CoreApiClient();
await client.mutation({
updateTask: {
__args: { id: recordId, data: { status: 'ARCHIVED' } },
id: true,
},
});
await enqueueSnackbar({
message: 'Record archived',
variant: 'success',
});
await closeSidePanel();
};
return (
Archive this record?
);
};
export default defineFrontComponent({
universalIdentifier: 'c9d0e1f2-a3b4-5678-cdef-789012345678',
name: 'archive-record',
description: 'Archives the current record',
component: ArchiveRecord,
});
```
### 处理多个记录
使用 `useSelectedRecordIds()` 来处理多个已选记录。 这对于批量操作很有用:
```tsx src/front-components/bulk-export.tsx theme={null}
import { defineFrontComponent } from 'twenty-sdk/define';
import { useSelectedRecordIds } from 'twenty-sdk/front-component';
import { enqueueSnackbar, closeSidePanel } from 'twenty-sdk/front-component';
import { CoreApiClient } from 'twenty-client-sdk/core';
const BulkExport = () => {
const selectedRecordIds = useSelectedRecordIds();
const handleExport = async () => {
const client = new CoreApiClient();
for (const recordId of selectedRecordIds) {
await client.mutation({
updateTask: {
__args: { id: recordId, data: { exported: true } },
id: true,
},
});
}
await enqueueSnackbar({
message: `Exported ${selectedRecordIds.length} records`,
variant: 'success',
});
await closeSidePanel();
};
return (
Export {selectedRecordIds.length} selected record(s)?
);
};
export default defineFrontComponent({
universalIdentifier: 'd0e1f2a3-b4c5-6789-defa-012345678901',
name: 'bulk-export',
description: 'Export selected records',
component: BulkExport,
});
```
通过仅限记录选择的[命令菜单项](/l/zh/developers/extend/apps/layout/command-menu-items)将其呈现出来:
```ts src/command-menu-items/bulk-export.command-menu-item.ts theme={null}
import { defineCommandMenuItem } from 'twenty-sdk/define';
export default defineCommandMenuItem({
universalIdentifier: 'd0e1f2a3-b4c5-6789-defa-012345678902',
label: 'Bulk Export',
availabilityType: 'RECORD_SELECTION',
frontComponentUniversalIdentifier: 'd0e1f2a3-b4c5-6789-defa-012345678901',
});
```
## 公共资源
前端组件可以使用 `getPublicAssetUrl` 访问应用的 `public/` 目录中的文件:
```tsx theme={null}
import { defineFrontComponent } from 'twenty-sdk/define';
import { getPublicAssetUrl } from 'twenty-sdk/utils';
const Logo = () => }) ;
export default defineFrontComponent({
universalIdentifier: '...',
name: 'logo',
component: Logo,
});
```
详情请参见[公共资源部分](/l/zh/developers/extend/apps/config/public-assets)。
## 样式
前端组件支持多种样式方案。 你可以使用:
* **内联样式** — `style={{ color: 'red' }}`
* **Twenty UI 组件** — Twenty 自身的组件库;请参阅下文的 [使用 Twenty UI 组件](#using-twenty-ui-components)
* **Emotion** — 使用 `@emotion/react` 的 CSS-in-JS
* **Styled-components** — `styled.div` 模式
* **Tailwind CSS** — 工具类
* **任何 CSS-in-JS 库**(与 React 兼容)
## 使用 Twenty UI 组件
Twenty 通过 [`twenty-ui`](https://www.npmjs.com/package/twenty-ui/v/1.0.0-alpha.1) 包提供其组件库。 前端组件可以将其用于按钮、标签、状态徽章、Chip、头像、图标、排版,以及能够自动匹配工作区明暗主题的主题令牌。
### 安装
将该包添加到你的应用中,并固定为你的 Twenty 实例所提供的版本:
```bash theme={null}
yarn add twenty-ui@1.0.0-alpha.1
```
`twenty-ui` 会在构建时被打包进你的前端组件中,因此它只需要作为你的应用的依赖——在运行时无需任何配置。
### 导入组件
请从匹配的子路径而不是包根路径导入,这样只有你使用到的组件才会被打包进你的 bundle:
| 子路径 | 导出内容 |
| --------------------------- | --------------------------------------- |
| `twenty-ui/input` | `Button` 和表单输入组件 |
| `twenty-ui/data-display` | `Tag`、`Status`、`Chip`、`Avatar` 等 |
| `twenty-ui/feedback` | `Callout`、`Banner`、`Info` 等 |
| `twenty-ui/typography` | `H1Title`、`H2Title`、`H3Title`、`Label` 等 |
| `twenty-ui/icon` | `Icon*` 组件(例如 `IconCheck`) |
| `twenty-ui/theme-constants` | `ThemeProvider`、`themeCssVariables` |
```tsx theme={null}
import { defineFrontComponent } from 'twenty-sdk/define';
import { Status, Tag } from 'twenty-ui/data-display';
import { Button } from 'twenty-ui/input';
const StyledWidget = () => {
return (
;
export default defineFrontComponent({
universalIdentifier: '...',
name: 'logo',
component: Logo,
});
```
详情请参见[公共资源部分](/l/zh/developers/extend/apps/config/public-assets)。
## 样式
前端组件支持多种样式方案。 你可以使用:
* **内联样式** — `style={{ color: 'red' }}`
* **Twenty UI 组件** — Twenty 自身的组件库;请参阅下文的 [使用 Twenty UI 组件](#using-twenty-ui-components)
* **Emotion** — 使用 `@emotion/react` 的 CSS-in-JS
* **Styled-components** — `styled.div` 模式
* **Tailwind CSS** — 工具类
* **任何 CSS-in-JS 库**(与 React 兼容)
## 使用 Twenty UI 组件
Twenty 通过 [`twenty-ui`](https://www.npmjs.com/package/twenty-ui/v/1.0.0-alpha.1) 包提供其组件库。 前端组件可以将其用于按钮、标签、状态徽章、Chip、头像、图标、排版,以及能够自动匹配工作区明暗主题的主题令牌。
### 安装
将该包添加到你的应用中,并固定为你的 Twenty 实例所提供的版本:
```bash theme={null}
yarn add twenty-ui@1.0.0-alpha.1
```
`twenty-ui` 会在构建时被打包进你的前端组件中,因此它只需要作为你的应用的依赖——在运行时无需任何配置。
### 导入组件
请从匹配的子路径而不是包根路径导入,这样只有你使用到的组件才会被打包进你的 bundle:
| 子路径 | 导出内容 |
| --------------------------- | --------------------------------------- |
| `twenty-ui/input` | `Button` 和表单输入组件 |
| `twenty-ui/data-display` | `Tag`、`Status`、`Chip`、`Avatar` 等 |
| `twenty-ui/feedback` | `Callout`、`Banner`、`Info` 等 |
| `twenty-ui/typography` | `H1Title`、`H2Title`、`H3Title`、`Label` 等 |
| `twenty-ui/icon` | `Icon*` 组件(例如 `IconCheck`) |
| `twenty-ui/theme-constants` | `ThemeProvider`、`themeCssVariables` |
```tsx theme={null}
import { defineFrontComponent } from 'twenty-sdk/define';
import { Status, Tag } from 'twenty-ui/data-display';
import { Button } from 'twenty-ui/input';
const StyledWidget = () => {
return (
);
};
export default defineFrontComponent({
universalIdentifier: 'e5f6a7b8-c9d0-1234-efab-567890123456',
name: 'styled-widget',
component: StyledWidget,
});
```
### 图标
从 `twenty-ui/icon` 导入单个图标:
```tsx theme={null}
import { IconBox, IconCheck } from 'twenty-ui/icon';
```
每个具名图标都支持 tree-shaking,因此只导入少量图标对 bundle 体积影响很小。 避免使用 `IconsProvider`、`useIcons` 和 `iconsState`——它们会引入完整的 Tabler 图标集(数 MB 大小)。
### 主题和主题令牌
Twenty UI 组件会自动匹配工作区的明暗主题——渲染器会在宿主上应用当前启用的配色方案,组件会基于该方案解析自己的颜色。
要在你自己的行内样式中使用相同的设计令牌,请调用 `useTheme()` hook。 它会返回与当前主题关联的 Twenty 主题令牌(间距、颜色、圆角、字体),你的组件中无需设置 `ThemeProvider`:
```tsx theme={null}
import { useTheme } from 'twenty-ui/theme-constants';
const Card = () => {
const theme = useTheme();
return (
Themed card
);
};
```
由于 `useTheme()` 是一个 hook,你需要在组件主体内部读取令牌,因此这些值始终能反映实时的主题。 同一份令牌映射也作为常量 `themeCssVariables` 导出,但在前端组件中更推荐使用 `useTheme()`——在应用清单被抽取时,解引用 `themeCssVariables` 的模块级常量可能会是 undefined。
如果需要显式地根据当前配色方案做分支判断,可从 `twenty-sdk/front-component` 中使用 `useColorScheme()` 读取,它会返回 `'light'` 或 `'dark'`。